Upon completing this lab go log onto OWL. A Lab Owl section should now appear in your courses and your first assignment, Lab Owl: Exp 2 should appear in this section. You have until your next scheduled laboratory to complete this assignment. Three more assignments will appear here as the semester progresses. Remember, these Lab Owls are worth 25% of your laboratory grade.
Introduction:Stoichiometry and Solutions
In experiment two we dealt with solids and moles. The most sophisticated and successful chemical factory of all is our own bodies. Here a vast array of very complicated reactions occur constantly, with most occurring in aqueous solution. When dealing with solutions one is usually concerned with concentration. Concentration is not an unfamiliar term, in that in the geographical and political context the term "people concentration" is often used in allocating funds and describing population densities in various areas of the continent. "People concentration" being simply the number of people in a given region divided by the area of that region. While the number of people in two given regions may be the same, the area of that region may be vastly different, and thus represent different concentrations.
In the chemical world concentration is expressed in terms of the quantity of a substance (our new friend the mole) per liter of solution and is called Molarity (M).
Concentration = M = mol of solute/liters of solution
This can also be rearranged to express moles directly:
mol = M x V = (mol/liter) x liter
Consider the example of taking a known quantity of solid (e.g. table salt) and dissolve it in some volume of water. The concentration of that solution could be calculated by determining the number of moles of NaCl added and dividing by the total volume of the solution. If one were to then add more water, while the concentration of the solution would change (volume of the solution changes) the quantity of salt (mol of salt) in the water would not. (We didn't add any more salt!!!). In doing this experiment we will make use of this.
Making a Solution of Known Concentration:
Your goal in this experiment is to make a 0.10M solution of NaOH. The volume of the solution that you are to make is dictated by the volume of the Erlenmeyer flask provided.
In order to make your solution you need to first
determine the number of moles of solute (in this case NaOH) that you require
in your solution. This is easily determined from:
|
Molarity of the Solution Required
|
|
Moles of Solute/Liters of Solution |
|
Molarity of the Solution Required
|
|
0.10M |
|
Moles of solute
|
|
Moles of NaOH
..... this is what we need to determine |
|
Volume of Solution in Liters
|
|
Capacity (Volume) of the Erlenmeyer Flask provided in Liters. |
Now that you know the moles of NaOH that you require all you have to do is get this quantity. Since NaOH is a solid we could in fact convert moles of NaOH required to grams of NaOH required as per experiment 2. Then making the solution is simply weighing out the required amount of NaOH and dissolving it in desired amount of water.
Then just to be sure, it would be nice to be able to test the solution!
Testing Your Solution:
The reaction between an acid and base produces a
salt and water, something that you may have heard before.
In order to test the accuracy of the solution that you have made you
are going to take a known volume of your NaOH solution and react it with
0.10M HCl. Since both the base (NaOH) and the acid (HCl) have the
same concentration (assuming of course that your solution is 0.10M) then
the volume of HCl required to react completely with your base should equal
the volume of the base used in the analysis.
NaOH(aq) + HCl(aq) = NaCl(aq) + H2O(l)
The process used to carry out this addition is called titration. This is where one of the reagents (in our case NaOH) is added slowly from a buret to a known volume of the acid (HCl). The point at which sufficient reactant has been added to just complete the reaction is called the equivalence point. This is what we would like to determine since at this point we have added sufficient amount (moles) of NaOH to react with all the entire (moles) of the HCl. A method to determine this, visually, is to add a dye (referred to as an indicator) that changes color at or extremely close to this point. The point at which the indicator actually changes color is referred to as the end point. As far as we are concerned at this stage, the end point and the equivalence point are the same.
Precision and Accuracy:
These are two terms that often lead to some confusion.
Precision
is the degree to which a number of measurements are reproducible. How close measurements
are to one another. Accuracy, on the other hand,
is how good the actual measurement is. How does it compare to the known
value, or, in the case where it is not known, how close is it to identical
measurements being made by other people on the same system. It is possible
to have a high degree of precision yet lack accuracy. This is often either
the failure in some aspect of the experimental design or of the operator.
This lab is a case in point. You will endeavor to determine when the reaction
has reached its equivalence point by observing a color change in a dye.
It may well happen that for each trial you obtain a good degree of precision
(reproducibility) but the color intensity to which you titrated each sample
was a few drops beyond the actual equivalence point, hence little accuracy.
A measure of the precision with which you made your
NaOH solutions is to determine a % difference between the volume of NaOH
required to reach the equivalence point and the anticipated volume required
if the solution were actually 0.10M.
| % Difference |
|
{(Volume NaOH required to reach the equivalence point - Volume NaOH anticipated to reach the equivalence point)/Volume NaOH anticipated to reach the equivalence point}x 100 |
For this experiment this translates to:
| % Difference |
|
{(Volume NaOH required to reach the equivalence point - Volume HCl reacted)/Volume HCl reacted}x 100 |
The value obtained may be negative: it is common practice to simple take the absolute value of this thus obtaining a positive quantity. The number obtained while it can reflect your technique s not totally dependent on that alone. The apparatus and the solutions given all give rise to some error.
Using a Buret:
 When it comes to determined volumes there are a various number of instruments
that can be used, and the choice is dictated by the degree of precision
and accuracy required of the measurements. In the equipment available to
you, the buret is the most accurate and precise piece of apparatus in determining
the volume of liquids and solutions dispensed. It can without too much
practice be used to determine the volume of liquid dispensed to within
0.02mL and with a little practice 0.01mL. From the graduation markers depicted
you can see that the smallest division on the buret is 0.1mL and you will
have to approximate the second decimal place. In general, we read the bottom
of the meniscus, which is facilitated by placing a dark piece of paper
behind the buret. Your TA will demonstrate a correct method to use a buret.
You may adapt this method to your own style, so long as your method results
in reproducible results! Check with your TA.
When it comes to determined volumes there are a various number of instruments
that can be used, and the choice is dictated by the degree of precision
and accuracy required of the measurements. In the equipment available to
you, the buret is the most accurate and precise piece of apparatus in determining
the volume of liquids and solutions dispensed. It can without too much
practice be used to determine the volume of liquid dispensed to within
0.02mL and with a little practice 0.01mL. From the graduation markers depicted
you can see that the smallest division on the buret is 0.1mL and you will
have to approximate the second decimal place. In general, we read the bottom
of the meniscus, which is facilitated by placing a dark piece of paper
behind the buret. Your TA will demonstrate a correct method to use a buret.
You may adapt this method to your own style, so long as your method results
in reproducible results! Check with your TA.
Experimental Procedure:
Making a Solution of Known Concentration:
| Be cautious when using NaOH. It is caustic and will cause burns on prolonged contact with skin. Just for your own protection use the disposable latex gloves that are in the balance room. Please try to avoid spilling the solid sodium hydroxide on the balances. | ||
| 1. | Your goal is to prepare 125mL of 0.1M NaOH solution. | |
| 2. | Determine the number of moles of NaOH required to make your 0.10M NaOH solution. | |
| 3. | Determine the number of grams of NaOH required to
make your solution. Have your TA check this calculation. |
|
| 4. | As accurately as you can, weigh the desired quantity of NaOH into the weighing boat provided. | |
| 5. | Transfer the NaOH to your Erlenmeyer flask and add approximately 3/4 of the desired volume of distilled water. Swirl the contents until all the NaOH has dissolved. | |
| 6. | Now using a wash bottle, add distilled water until the mixture has the desired volume. | |
| 7. | Stopper the flask and shake vigorous to ensure that you have a homogeneous solution. | |
| You have made a 0.10M NaOH solution. It was not that difficult, was it? Now let's see how well you have done by testing it! | ||
Testing Your Solution:
| 1. | Fill your wash bottle and buret with distilled water. Drain the buret and note whether it runs clean and does not leak. If drops of water adhere to the inner walls, clean the buret with the solution and brush found on the end bench. If the buret leaks, consult with your TA. | |||
| 2. | Wash thoroughly two 125-mL Erlenmeyer flasks. Rinse thoroughly with distilled water. The flasks may be left wet on the inside, but the outside should be dried. | |||
| 3. | Obtain approximately 100mL of 0.10M HCl (The concentration of the HCl solution is known exactly). Use a clean dry beaker to obtain this. | |||
| 4. | Set your pipetter to 4.0mL and transfer 5x4.0mL portions of your 0.10M HCl to each of your Erlenmeyer flasks. | |||
| 5. | Add two or three drops of phenolphthalein indicator to the flasks containing the HCl. Swirl each flask. | |||
| 6. | Rinse the buret with two or three 10-mL portions of the sodium hydroxide solution, fill the buret with this solution and label the buret "NaOH." Do not attempt to fill the buret to exactly any line. | |||
| 7. | Remove any air bubbles from the tip of the base buret. Take the initial buret reading to the closest 0.01 or 0.02mL. Record data to TWO decimal places, with no readings coarser than ± 0.02mL. | |||
| 8. | 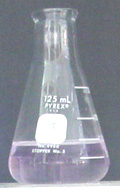 |
Since you known that the molarity of the two solutions should be approximately the same you may add ~18mL of NaOH to Erlenmeyer flask quickly. Close the stopcock on the buret and swirl the contents of the Erlenmeyer. Wash the sides of the Erlenmeyer down with approximately 30mL of distilled water. Use your wash bottle to do this. Now to facilitate observing the color change, place a piece of white paper under the Erlenmeyer flask. Continue titrating but now adding just one drop at a time until a faint but permanent pink color change is observed. You have reached the equivalence point. | 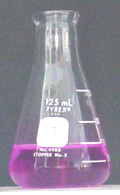 |
|
| On the left, the end point. On the right, two drops beyond the end point! | ||||
| 9. | Record the volume of NaOH required to reach the equivalence point. | |||
| 10. | Determine a % Difference for this trial. | |||
| 11. | Repeat the titration using your second sample. | |||
| 12. | Discard your NaOH in the container provided and thoroughly wash the Erlenmeyer flask. | |||