The Scientific Method:
All living and nonliving entities, from single cells and complex animals to stars and galaxies, undergo change. They emerge, age, die, and continue to change even after death. Science is the careful inquiry into the many changes that occur within us, around us, and throughout our universe.
Some of the observations that we make about the properties and behavior of the matter around us are qualitative and others are quantitative. The result of an accurate observation is a fact. Often we find patterns in the facts we observe. A law is a concise verbal or mathematical statement of a generally observed pattern of behavior.
After many facts have been observed, it is human nature to try to discover or develop an explanation for the observations (facts). Scientists use their imaginations and reasoning powers to develop speculative explanations called hypotheses for their observations. They then perform additional experiments, make further observations to weed out false conjecture, and try to develop better explanations called theories. This approach used by scientists to develop, test, and refine explanations for observed changes is called the scientific method.
The use of the scientific method is not confined to scientific laboratories. Good detectives use the scientific method in investigating a crime, and doctors use it in diagnosing illnesses. The following is an example of the use of the scientific method in a hospital.
A two-year-old child was brought to the hospital. The child had been vomiting for several weeks. No apparent abnormalities were visible. Blood tests showed low hemoglobin levels. The red blood cell count was also low. These tests indicated anemia of unspecified origin. X-rays showed some opaque material in the intestinal lining and along the growth areas of the bones. With this information the doctors were ready to advance a hypothesis: that opaque material accumulated in the intestines and in the growth areas of the bones was a heavy metal and that the child was suffering from heavy metal poisoning.
It was now necessary to test the hypothesis. If there was a heavy metal, the child must somehow have ingested it. In this case, the first test consisted of asking the parents. The doctors learned that the family lived in a rundown house that had peeling paint and that the child had a habit of chewing on windowsills. Since house paint can contain significant amounts of lead, a heavy metal, this lent support to the hypothesis, but it still needed further testing. The next test was for lead in the blood, and it was found that almost two and a half times the normal lead concentration was present.
The hypothesis could now be regarded as confirmed. As a final test, treatment for lead poisoning was provided. Calcium EDTA, a chemical that extracts heavy metals, binds them tightly, and carries them through the kidney membranes into the urine, was administered. One day after the injection a 25-fold increase in lead concentration was found in the child's urine. A few days later the poisoning symptoms disappeared, and after a week the patient was discharged, cured.
Bettelheim/March: Introduction to General, Organic,
and Biochemistry, 5/e, p. 10
Whitten/Davis/Peck: General Chemistry
with Qualitative Analysis, 5/e, p. 5
Using the Scientific Method .... A Goal of this Experiment.
Today's laboratory while not as dramatic as the aforementioned lead poisoning case, will invoke your reasoning powers and some of the methods mentioned in this article. When you arrive in the laboratory take a look at the nutritional labels on the bottles of diet and regular soda. What do you notice? What differences do you see in the quantities of the the primary ingredients?
As you note the ingredients it becomes apparent that there are a number of ingredients in a can of soda. The primary ingredient is however water and soda is a classic example of a solution. A solution is simply a homogenous mixture of two or more substances. We generally categorize the components of a solution. The ingredient that is there in the greatest quantity is referred to as the Solvent which in the case of our sodas is water. The other ingredients are referred to as Solutes. The word homogenous is important with respect to solutions. It simply means that random samples of the solution have identical compositions. We will meet this important idea again in experiment three. For the moment though, the next time you put milk or creamer in your coffee or tea, ponder if this mixture would ever meet the criteria of being a solution?
Your TA will point out to you the location of two other containers. The labels on these containers have been lost. All that we now about them is that one contains regular soda and the other diet soda. You are going to have to determine which container contains what by the end of this laboratory period, by making some measurement that will allow you to differentiate between the two. Taste is not a quantitative measurement!, and the soda in the containers have been thoroughly degassed (the soda is flat)!
While you let your brain wrestle with this problem lets us introduce the various tools available in this laboratory.
Measurements: Mass, Volume, Temperature.
Mass: Electronic Balance:
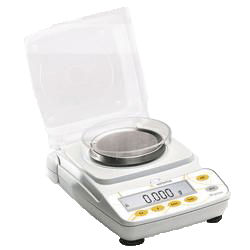 |
These
balance
measure to 0.001g (1mg) and when you use it you should always record
all three decimal places. The S.I. unit for mass is the kilogram
(1 kg = 1000g). However it is not common to express mass in the laboratory
in kilograms. Be aware that this balance is somewhat delicate and very sensitive. Do not remove the plastic guard around each. While it may not always be practical to do so, it is good practice to stick with the same balance during any particular experiment. During the first lab, your TA will demonstrate the various idiosyncrasies of this balance! When doing any weighing, please observe the following: |
- Do not remove the plastic guard around each balance.
- Do not move the balance, this throws off the calibration and necessitates recalibration of the balance.
- Weigh chemicals in containers that are dry on the outside. Never weigh directly on the pan.
- Weigh everything at room temperature.
- Zero the balance and avoid leaning on the benches as this in fact interferes with the weighing!
Volumes:
When it comes to measuring volumes there is a number of devises available to you. The buret, the pipettor and the graduated cylinder are the ones that you will use in this laboratory. Each have their own characteristics depending on the degree of precision or accuracy that you are looking for. All record volume in milliliters or mL ( the pipettor in microliters, where 1 microliter = 0.001mL). The most common unit for volume is the Liter and in the laboratory volumes measured will usually be referred to L. (1L = 1000mL)
Precision V Accuracy: Precision is the degree to which a number of measurements agree with one another. You may wish to dispense a 5mL volume of a solution but the instrument that you choose, while it is set to deliver 5mL actually only delivers 4.8mL. It does however delivery this exact volume every time you use it. This type of instrument would be regarded as precise but not accurate. In order for it to be accurate and precise it should have consistently delivered 5mL.
Before you tackle the dilemma with the soda containers you will first explore the precision and accuracy of the Pipettor, the Buret, and the graduated cylinder. This should help you in determining what instrument you should use in tackling the soda problem.
Temperature: The Thermometer
 When measuring temperature the thermometer is what we use. There
is no difficult with respect to reading these, whether they are the mercury
thermometer found in your laboratory drawer or a digital thermometer purchased
at a pharmacy to measure body temperature. The only difference being in
the scales used. In the laboratory we measure temperature using the
Celsius Scale, a scale made by defining the normal freezing point of water
as 0oC and the normal boiling point of water as 100oC.
This gives us 100 divisions between the freezing point and the boiling
point. Each division is 1oC. This is the scale that
the thermometers in you laboratory drawers measure in. The S.I. unit
for temperature is the Kelvin (K) scale, and this is the scale that you
will use in many of the calculations that you will do in this course.
Fortunately conversion from oC to K is straightforward, just
add 273 to the centigrade value. (I am being a little cavalier with
my conversion here as the conversion factor is +273.15). The Kelvin
scale is very similar to the Celsius scale in that the scale is set such
that normal freezing point of water is 273K ( 0 + 273 = 273) and the normal
boiling point as 373K (100 + 273 = 373). Thus both scales are very
similar. The third scale, the Fahrenheit scale is one that you still
see in meteorology and in most digital thermometers bought at a pharmacy.
It is different but the basic idea is the same. With this scale the
normal freezing point of water is set at 32oF and the normal
boiling point at 212oF. Thus this sale has 180 divisions
between the freezing point of water and its boiling point. Thus 1oF
is a smaller division that 1oC. (In fact it is 100/180
or 5/9 times smaller). We will not be dealing with Fahrenheit in
the laboratory but it is mentioned here as it is a scale that you will
encounter in other areas.
When measuring temperature the thermometer is what we use. There
is no difficult with respect to reading these, whether they are the mercury
thermometer found in your laboratory drawer or a digital thermometer purchased
at a pharmacy to measure body temperature. The only difference being in
the scales used. In the laboratory we measure temperature using the
Celsius Scale, a scale made by defining the normal freezing point of water
as 0oC and the normal boiling point of water as 100oC.
This gives us 100 divisions between the freezing point and the boiling
point. Each division is 1oC. This is the scale that
the thermometers in you laboratory drawers measure in. The S.I. unit
for temperature is the Kelvin (K) scale, and this is the scale that you
will use in many of the calculations that you will do in this course.
Fortunately conversion from oC to K is straightforward, just
add 273 to the centigrade value. (I am being a little cavalier with
my conversion here as the conversion factor is +273.15). The Kelvin
scale is very similar to the Celsius scale in that the scale is set such
that normal freezing point of water is 273K ( 0 + 273 = 273) and the normal
boiling point as 373K (100 + 273 = 373). Thus both scales are very
similar. The third scale, the Fahrenheit scale is one that you still
see in meteorology and in most digital thermometers bought at a pharmacy.
It is different but the basic idea is the same. With this scale the
normal freezing point of water is set at 32oF and the normal
boiling point at 212oF. Thus this sale has 180 divisions
between the freezing point of water and its boiling point. Thus 1oF
is a smaller division that 1oC. (In fact it is 100/180
or 5/9 times smaller). We will not be dealing with Fahrenheit in
the laboratory but it is mentioned here as it is a scale that you will
encounter in other areas.
Experimental Procedure:
Using the Laboratory Tools:
| 1. |
Record the temperature of the laboratory using the thermometer in your
drawer. The density of water for several temperature ranges is given
below. Use your observed T (converted to Kelvin) and this data to
get the density of water to use in determining the accuracy of the buret,
pippetor and graduated cylinder. Temperature Range(Kelvin) Density of Water(g/mL) 286 - 291 0.999 292 - 296 0.998 297 - 300 0.997 301 - 303 0.996 |
||
| 2. | Weigh a clean 125mL Erlenmeyer flask. You should make sure that the outside of the flask is thoroughly dry. | ||
| 3. | Add 5mL of water using a graduated cylinder. | ||
| 4. | Reweigh the Erlenmeyer flask and determine the density of water ( density = mass/volume). | ||
| 5. | Repeat this three more times. | ||
| 6. | 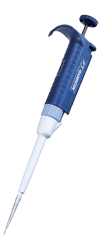 |
Repeat the above using the Buret and the Pippetor. | |
| 7. | Based on your data, which of the three instruments was the most consistent (precise). Which if any were both precise and accurate. | ||
The Soda Problem!
Now you are in a position to tackle the soda dilemma. You have to determine, by performing some experimental measurement, which container contains the regular and which the diet. When you have devised a plan, discuss it with your TA and be prepared to justify the instrument(s) that you wish to use to solve the problem.